
PERSONAL FALL ARREST AND FALL RESTRAINT
SYSTEMS
It is important for you to understand
the difference between a fall arrest system and fall restraint system.
These are most commonly used in the construction industry, but may apply to
many other situations where employees must work at heights.
FALL RESTRAINT: A fall restraint
system consists of the equipment used to keep an employee from reaching
a fall point, such as the edge of a roof or the edge of an
elevated working surface. The most commonly utilized fall restraint system is a
standard guardrail. A tie off system that "restrains" the employee
from falling off an elevated working surface is another type of fall restraint.
FALL ARREST: According to the
definition in the Federal OSHA standard, a personal fall arrest system means a
system used to arrest an employee in a fall from a working
level. It consists of an anchor point, connectors, a body belt or body harness
and may include a lanyard, deceleration device, lifeline, or suitable
combinations of these. The entire system must be capable of withstanding the
tremendous impact forces involved in stopping or arresting the
fall. The forces increase with the fall distance due to acceleration (a person
without protection will free fall 4 feet in 1/2 second and 16 feet in 1
second!).
Let's review 5 key
requirements for fall arrest systems:
1) Body belts may not be used after
12/31/97. In the meantime, body belts can only be used if the system limits the
maximum arresting force on an employee to 900 pounds. A maximum arresting force
of 1800 pounds is allowed when a body harness is utilized. In some
jurisdictions, such as Washington State, belts are currently not allowed for
fall arrest purposes.
2) The system must be rigged so that an
employee cans neither free-fall more than 6 feet nor contact a lower level.
After the free-fall distance, the deceleration or shock absorbing component of
the system must bring an employee to a complete stop within 3.5 additional
feet.
3) The anchorage point must be
capable of supporting at least 5000 pounds per employee. Most standard
guardrail systems are not adequate anchorage points because they are not built
to withstand the impact forces generated by a fall.
4) The system's D-ring attachment
point for body harnesses shall be in the center of the employee's back near the
shoulder level.
5) The system components must be
inspected for damage and deterioration prior to each use. All components
subjected to the impact loading forces of a free-fall must be immediately
removed from service.
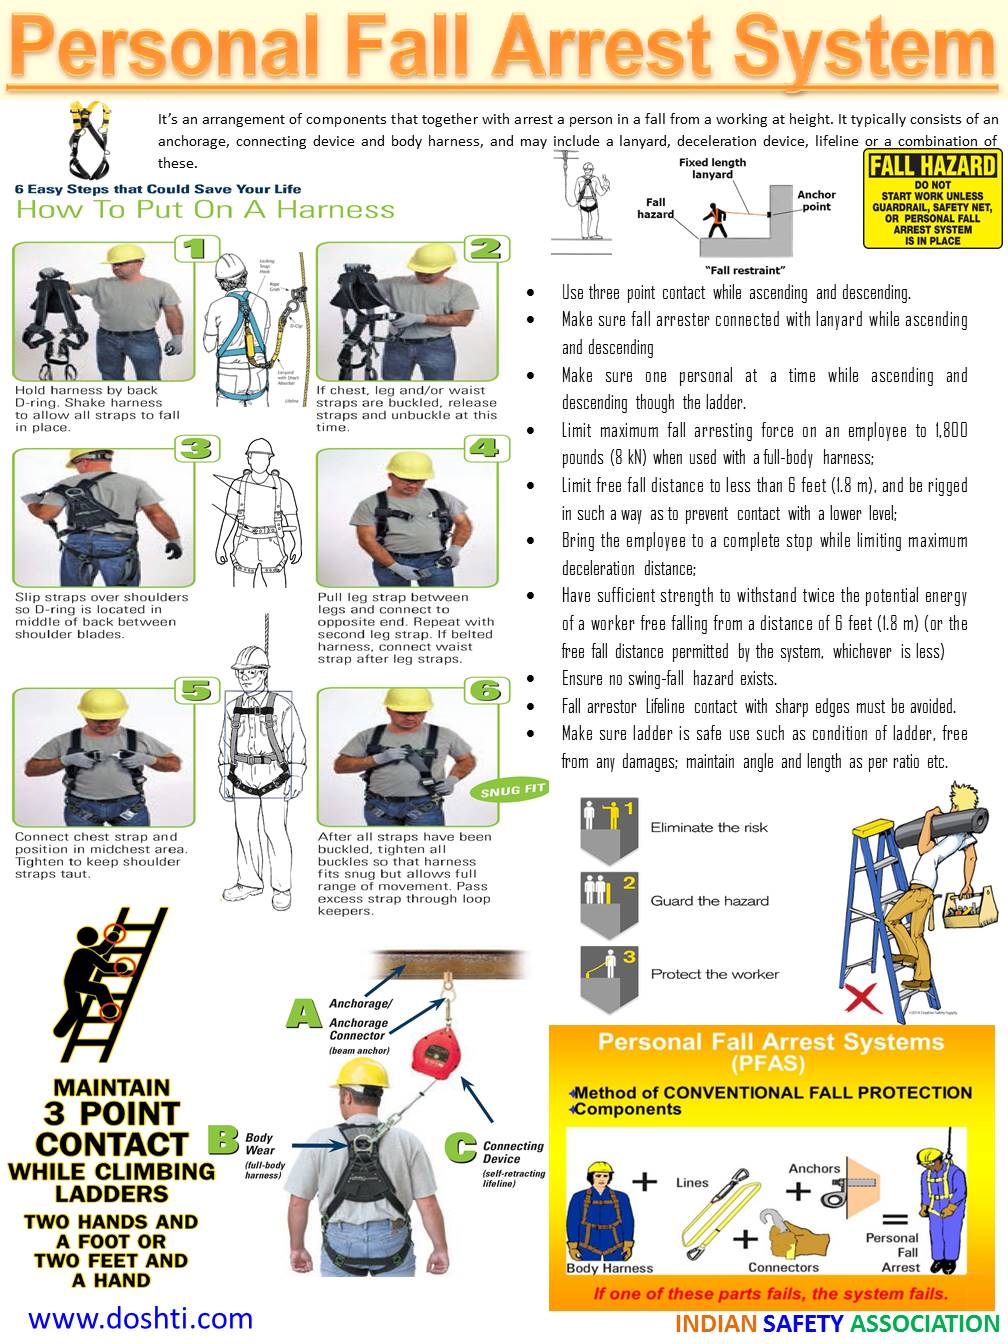
Personal Fall Arrest System
A Personal Fall Arrest System is
comprised of three (3) key components – Anchorage
connector; Body wear; and Connecting device.
While a lot of
focus has been given to anchorage connectors and body wear (full-body
harnesses), when discussing fall protection, the connecting device (a
shock-absorbing lanyard or self-retracting lifeline) between these two
components actually bears the greatest fall forces during a fall.
Anchorage/Anchorage Connector
Anchorage: Commonly referred
to as a tie-off point (Ex: I-beam, rebar, scaffolding, lifeline, etc.)
Anchorage Connector: Used to join the
connecting device to the anchorage (Ex: cross-arm strap, beam anchor, D-bolt,
hook anchor, etc.)
·
Anchorages must be capable of supporting 5,000 pounds (22kN) of force
per worker.
·
Must be high enough for a worker to avoid contact with a lower level
should a fall occur.
·
The anchorage connector should be positioned to avoid a “swing fall.”
Body Wear
Body Wear: The personal
protective equipment worn by the worker (Ex: full-body harness)
·
Only form of body wear acceptable for fall arrest is the full-body
harness.
·
Should be selected based on work to be performed and the work
environment.
·
Side and front D-rings are for positioning only.
Connecting Device
Connecting Device: The critical
link which joins the body wear to the anchorage/anchorage connector (Ex:
shock-absorbing lanyard, fall limiter, self-retracting lifeline, rope grab, etc.)
·
Potential fall distance must be calculated to determine type of
connecting device to be used – typically, under 18-1/2 ft. (5.6m), always use a
self-retracting lifeline/fall limiter; over 18-1/2 ft. (5.6m), use a
shock-absorbing lanyard or self-retracting lifeline/fall limiter.
·
Should also be selected based on work to be performed and the work
environment.
·
Shock-absorbing lanyards can expand up to 3-1/2 ft. (1.1m) when
arresting a fall; attach lanyards to the harness back D-ring only; never tie a
knot in any web lanyard – it reduces the strength by 50%.
Hierarchy of Fall Protection
It
is generally accepted by governing bodies that the hierarchy of fall protection
should provide the starting point for considering what type of fall protection
system is required.
1.
Eliminate the risk
Avoid
work at height where possible or locate plant and equipment in safe locations
where there is no risk of a fall.
2.
Guard the hazard
When
working at height is essential, ensure that workers are not exposed to
unnecessary risks; consider providing a parapet or guardrail to eliminate the
fall hazard.
3. Protect the worker
Where
it is not possible to eliminate the risk of falling, use suitable fall protection system to
minimise the consequences
of a fall. This
can be achieved with a fall arrest or fall restraint system–two completely
different entities.
In
essence, a fall restraint system prevents workers from reaching a hazard, while
a fall arrest system allows workers to reach a hazard and then protects them if
they should fall.
These
systems allow a person access to conduct their duties but prevent them from
reaching a point where a fall could occur.
Fall
Restraint systems are generally suitable if the person needs to work at the
edge of a hazard. For example, where there is a need to maintain gutters along
the edge of a roof, or if there are other potential fall hazards such as a
fragile roof, roof lights or air vents.
If
fitting a fall restraint system, it is recommended that the system should be
tested to fall arrest loads to ensure a person’s safety in situations where the
system may be misused (i.e. when the person using it wears an over-length
lanyard to enable access to the edge of a roof).
Restraint
systems are generally positioned more than 2 m from the hazard. This is because
common practice is for the worker to be connected to the system by a fixed
length 1.5 m lanyard.
Fall Arrest
A fall arrest system
provides maximum freedom of movement for workers to conduct their duties. In
doing so it allows them to reach the point where a fall could occur, such as
the edge of a roof for gutter maintenance. However, in the event of a fall, the
fall will be arrested and so allow the person to either effect a self-rescue or
be rescued.
Rescue
Following
a fall, consideration must be given to the rescue of the worker – in fact,
there is a legal obligation to have a full and comprehensive rescue plan in
place when individuals are working at height.

Using ladders safely
DO place the base of the ladder on a firm,
level, dry surface. If there’s a time when this isn’t possible – working on
grass, for instance – tie the feet of the ladder to stakes in the ground to
stop it slipping, and place a large flat wooden board underneath to help
prevent it sinking.
DON’T put a ladder on top of boxes, bricks, barrels
or any other unstable surface just to gain extra height.
DO position
the ladder so that the base won’t slip outwards. Leaning ladders are designed
so that their safest angle of use comes when every 1 measure out from the wall
is matched by 4 measures up it (rungs are usually about a third of a metre
apart, so its easy enough to get the distances roughly right). Most new
extension ladders now have a mark on the stiles to show the safest angle of
leaning.
Remember
the rule: ‘ONE OUT FOR FOUR UP’
The
more the base is moved out from this position, the greater the risk that it
will slip outwards suddenly and fall down without warning!
DO secure the bottom and the upper part of the
ladder, by tying them (from stiles, not rungs) with rope or straps onto a
stable , fixed object. You can tie the base to stakes in the ground, or use
fixed blocks or sandbags to help guard against the ladder slipping, or buy
special stabilisers. A rope or strap tied from a stile onto a fixed object at
about the height of the fifth rung from bottom will help to stop any further
movement.
If
it’s impossible for some reason to secure the ladder, get another adult to
‘foot’ it (by standing with one foot on the bottom rung and holding a stile in
each hand).
DO rest the top of the ladder against a solid
surface, never against guttering, or other narrow or plastic features. Where a
surface is too brittle or weak to support the top of the ladder, use a stay or
a stand-off resting on a firm surface nearby. Bolt or clip this to the top of
the ladder before putting up the ladder.
DO have at feast three rungs extending beyond a
roofs edge if you’re using a ladder to get yourself up onto the roof.
DO make
sure that longer extension ladders (over 18 rungs) have an overlap of at least
three rungs. Shorter ones (up to 18 rungs) need a minimum overlap of two.
DO keep your body facing the ladder at all
times, centred between the stiles.
DON’T reach
too far forwards or sideways, or stand with one foot on the ladder and the
other on something else.
DO move the ladder to avoid overstretching, and
re-secure it whenever necessary, however frustrating that might be!
DO try to keep both hands free to hold the ladder
as much as possible while you’re climbing or descending – if you need to carry
any tools, use a shoulder bag, belt holster or belt hooks.
DON’T carry heavy items or long lengths of material
up a ladder.
DO hold on to the ladder with one hand while you
work. You can get special trays which fit between the stiles to take paint
pots, tools etc.
DO wear strong, flat shoes or boots, with dry
soles and a good grip.
DON’T wear sandals, slip-ons or have bare feet on a
ladder.
DO make
sure a door is locked, blocked or guarded by someone if you’re up a ladder in
front of it.
DON’T use a ladder in a strong wind.
DON’T use
a ladder near any power lines.
DON’T be
tempted to use a ladder if you’re not fit enough, or suffer from giddiness or
aren’t confident with heights.
Here
are the main reasons why people choose aluminium ladders:
·
Strong
·
Durable
·
Lightweight
·
Corrosion-resistant
·
High tensile strength
·
Zero level thermal stress
·
Low maintenance required
·
Can withstand weather extremities
Please Note:
The content in
this newsletter is intended for general information purposes only. This
publication is not a substitute for review of the applicable government
regulations and standards, and should not be construed as legal advice or
opinion. Readers with specific compliance questions should refer to the cited
regulation or consult with an attorney.
Post by Indian Safety Association
www.doshti.com
3 comments:
I just want to thank you for sharing your information and your site or blog this is simple but nice Information I’ve ever seen i like it i learn something today. Whey Protein Isolate
Hello just wanted to give you a quick heads up. The text in your post seem to be running off the screen in Chrome. I'm not sure if this is a format issue or something to do with web browser compatibility but I thought I'd post to let you know. The design and style look great though! Hope you get the problem solved soon. Kudos
decking handrail height
That’s great! Just pumped up. You always give your best!
Super useful and awesome information here. I thank you! Thank you very much!
Have a look at our website to buy safety equipment's if you want.
Fall Protection Equipment
Post a Comment